> ## Documentation Index
> Fetch the complete documentation index at: https://moengage-user-guide.mintlify.site/llms.txt
> Use this file to discover all available pages before exploring further.
# SDK Authentication
# Overview
SDK Authentication is a Beta feature. For more details, reach out to your Customer Success Manager (CSM).
Protect the integrity of your data with SDK Authentication. This security feature ensures that only legitimate, logged-in users can send information from your app by stamping every request with a unique, server-generated digital signature: the JSON Web Token (JWT).
MoEngage automatically blocks any fraudulent or invalid data upon arrival (based on invalid JWT token), resulting in trustworthy user analytics and billing, free from corruption and malicious activity.
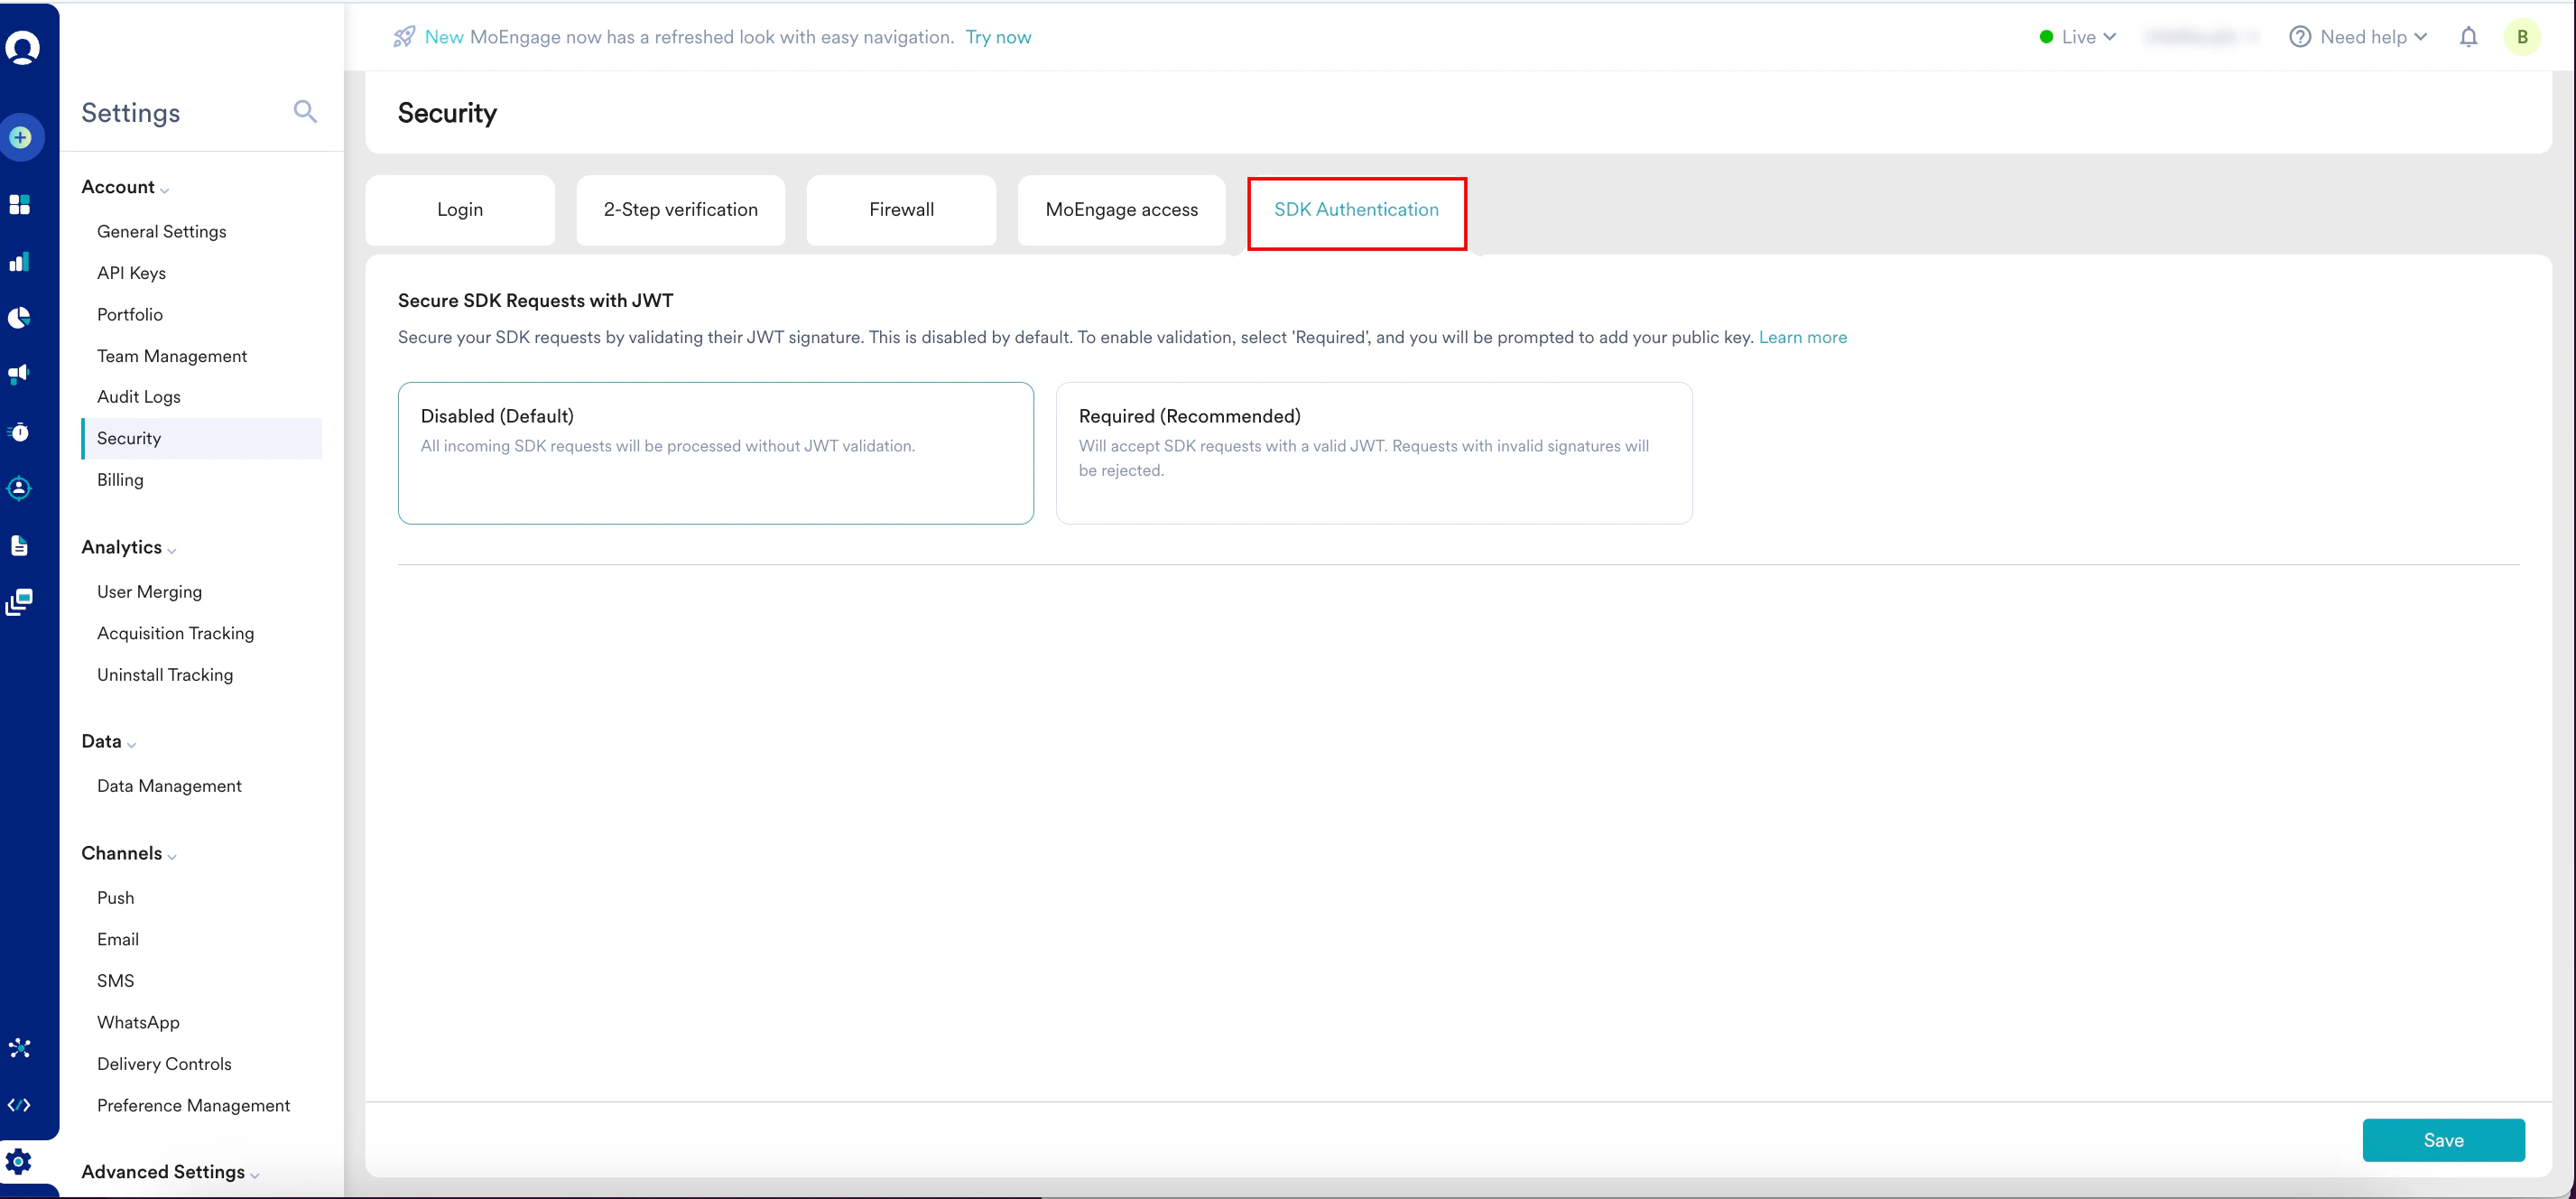
The following image shows the SDK Authentication dashboard:
 ## Use Cases
The SDK Authentication helps you with the following use cases:
* **Preventing user impersonation**: Block bad actors (unauthorized attempts) from maliciously updating another user's profile information (like their name, city, or preferences) or sending events on their behalf.
* **Securing high-value events**: Ensure the integrity of critical user actions like *purchase\_completed*, *subscription\_started*, or *demo\_requested*. This prevents fake events from corrupting your analytics and triggering incorrect marketing campaigns.
* **Maintaining data cleanliness**: Maintain high data quality by stopping unauthenticated requests from sending junk data, creating fraudulent user profiles, or corrupting the user database.
## Key Concepts
Before you begin, let's understand the following core concepts of this feature:
| Concept | Description |
| -------------------------- | ------------------------------------------------------------------------------------------------------------------------------------------------------------------------------------------------------------------------ |
| 🔑 Public and Private Keys | This feature uses public-key cryptography. Your team generates a pair of keys. The **Private Key** stays secret on your servers to sign requests. The **Public Key** is uploaded to MoEngage to verify those signatures. |
| 🚦 Enforcement Modes | This setting controls how strictly MoEngage enforces authentication. You can choose one of two modes: **Disabled(Default)** or **Required (Recommended)**. |
## Generate Keys and JWT
Before configuring the MoEngage dashboard, your team must set up the key generation and JWT creation on your server:
1. **Generate an RSA256 Public/Private Key Pair**: You must add the Public Key (Privacy Enhanced Mail (PEM) file) to the MoEngage dashboard, while the Private Key should be stored securely on your server. MoEngage recommends an RSA Key with 2048 bits for use with the RS256 JWT algorithm.
2. **Create a JSON Web Token for the Current User**. After you have your Private Key, your server-side application should use it to return a JWT to your app or website for the currently logged-in user. Typically, you can place this logic wherever your app normally requests the current user’s profile, such as a login endpoint or an endpoint that refreshes the current user’s profile.
When generating the JWT, you must include the following fields in the Header and Payload:
**Header**
| Field | Required | Description |
| ----- | -------- | --------------------------------- |
| alg | Yes | The supported algorithm is RS256. |
| typ | Yes | The type must be set to JWT. |
**Payload**
| Field | Type | Keys | Required | Description |
| ----- | ---- | ----- | -------- | ------------------------------------------------------------------------------------------------------------------------------ |
| sub | JSON | key | Yes | The key field within `sub` must match your User ID key (for example, uid). |
| | | Value | Yes | The value field within `sub` must contain the User ID value you pass to the MoEngage SDK when calling the `changeUser` method. |
| exp | Int | NA | Yes | The expiration of when you want this token to expire (in epoch timestamp). |
The following is an example for JWT Token and Payload:
```json Example wrap theme={null}
JWT\_Token = 'eyJ0eXAiOiJKV1QiLCJhbGciOiJSUzI1NiJ9.eyJzdWIiOnsia2V5IjoidWlkIiwidmFsdWUiOiJ1c2VyQG1vZW5nYWdlLmNvbSJ9LCJleHAiOjE3NTgyNjA0NzZ9.Wonz61\_b89MZjUtPuvYC4WBTDt\_ahdbihscbQvhLlzWjCM6ud5SFLrrzoJJG3eZ7BRikVNV8\_ovaPPDmUtXu6Eba1j2MNrBC5ZK3ULv1MsYnhjUyX8puCfq4bdrYOvA1NSGIEjg\_HcS18Zm7oY9\_5QyrMANw2GpjnasfKsnUopbsfxjJN-oWJpJ5Kz6wY0kFfN1eW3oXvkPoP\_EuXk6fPgL0KSXOEBJyjB9f08pgLmGRKLg28y8tJk8j\_GLLopcU3dIO6SDfKIlhm7t7jqFbp2HK8JxDcRa7AsJ5HvufLrKRKdf5\_y6vcTjJc4VfJIjfvXQGpvt1oeUjz\_Mx8kyts28pzb2k3-sqE2QmPGFfGGVEHz9f2E\_\_xZZOBrSHxUEFnNGVioTXmhYzJFNz2nRiunpj1aYeCu0naU8qpxakB7DWglQgf3etdIxpOHnwnhKdikY1v03JIbKX1XOWwnLw4AeW1qtx4DkZlAcMkF0CYUQ0b7kEJYa-UglUVVNhl3W8puwkPxCvUvjutoBlpyrZqYBXikat6qmZgc9rfPQfR08zTz1xS-IOq3dmW43z3GwIAyToJni65aWHBAVr0qM\_jrEniyqTXBC4Nw9\_RiRildxZzdP2OLfF0-3lyL7886nKShH11szbDcqWlP13rTppQkucO5IiUcjw7eRlGk7rj6s'
jwt\_header: {
"alg": "RS256",
"typ": "JWT"
}
jwt\_payload:
{
"sub": {
"key": "uid",
"value": "user@moengage.com"
},
"exp": 1755112555
}
public\_key = """
-----BEGIN PUBLIC KEY-----
MIICIjANBgkqhkiG9w0BAQEFAAOCAg8AMIICCgKCAgEAkFOpbMqO3sgQHBwATjz3
YQG3WXRaaych06Rvvpmxw6vA+Tbv/9LCbptZvnxXrL/h4bkdlyXKwe3ViN3lZsKR
eDG/a/gm85Zkb04O+/DujiOuoP6djxrm5KbAS6PrRaY9aPCH5IfTlFJjjOjFK4oO
wx/RbWNco4Kkb4wnhkGzKUAjO7w575uRMMv4T+RvdgpixaWpj6G7rKp7fqByqXYw
23xWSUodF0JNM5SatgQ3S2Imwnf0/7aEoPOhRAkH3XyTR+qIE66nof+YLLgqlnYC
s01MR26haoANxqijYFKZqwRXKBMxiV+NiUX0PaZpcfL2enIfBD6rGiBq9vdDX7Yr
aqZnpt1AhEGFcKCI+7MvIkDSKJ3K/QRnLvaL92Cj7ZYcaNrhfPfmHOTmFGrpsuln
DsCGazJbzsi+jqfzSF5Ewoc6Pte9b5u521QKbP8SpPYN8wEIIbDB8ZMwCUuUMBDd
Oy9wELkORwhcKmjVhD2CPcbmidbxCkm/691KDP7nOeIau2jOiytc1Q7pmYr0RErj
GUx1IbtQRFBozxCwWJ1rn0k1Ngt8WLc/Tm+dUu5Gb5ChHYd1wLWd6QITzt1cihGI
emtk9uqqW92X4YV3O1u+AM+sScvVehErHGF3WcyFgTQE0ZSruy4pliOO1rfxxMLW
rzOm15jmMVTnueqsgGbkMx0CAwEAAQ==
-----END PUBLIC KEY-----
"""
```
## Access the SDK Authentication Page
To access to the SDK Authentication page, perform the following step:
1. On the left navigation menu in the MoEngage dashboard, click **Settings** > **Account** > **Security**.
2. On the **Security** page, select the **SDK Authentication** tab.
## Use Cases
The SDK Authentication helps you with the following use cases:
* **Preventing user impersonation**: Block bad actors (unauthorized attempts) from maliciously updating another user's profile information (like their name, city, or preferences) or sending events on their behalf.
* **Securing high-value events**: Ensure the integrity of critical user actions like *purchase\_completed*, *subscription\_started*, or *demo\_requested*. This prevents fake events from corrupting your analytics and triggering incorrect marketing campaigns.
* **Maintaining data cleanliness**: Maintain high data quality by stopping unauthenticated requests from sending junk data, creating fraudulent user profiles, or corrupting the user database.
## Key Concepts
Before you begin, let's understand the following core concepts of this feature:
| Concept | Description |
| -------------------------- | ------------------------------------------------------------------------------------------------------------------------------------------------------------------------------------------------------------------------ |
| 🔑 Public and Private Keys | This feature uses public-key cryptography. Your team generates a pair of keys. The **Private Key** stays secret on your servers to sign requests. The **Public Key** is uploaded to MoEngage to verify those signatures. |
| 🚦 Enforcement Modes | This setting controls how strictly MoEngage enforces authentication. You can choose one of two modes: **Disabled(Default)** or **Required (Recommended)**. |
## Generate Keys and JWT
Before configuring the MoEngage dashboard, your team must set up the key generation and JWT creation on your server:
1. **Generate an RSA256 Public/Private Key Pair**: You must add the Public Key (Privacy Enhanced Mail (PEM) file) to the MoEngage dashboard, while the Private Key should be stored securely on your server. MoEngage recommends an RSA Key with 2048 bits for use with the RS256 JWT algorithm.
2. **Create a JSON Web Token for the Current User**. After you have your Private Key, your server-side application should use it to return a JWT to your app or website for the currently logged-in user. Typically, you can place this logic wherever your app normally requests the current user’s profile, such as a login endpoint or an endpoint that refreshes the current user’s profile.
When generating the JWT, you must include the following fields in the Header and Payload:
**Header**
| Field | Required | Description |
| ----- | -------- | --------------------------------- |
| alg | Yes | The supported algorithm is RS256. |
| typ | Yes | The type must be set to JWT. |
**Payload**
| Field | Type | Keys | Required | Description |
| ----- | ---- | ----- | -------- | ------------------------------------------------------------------------------------------------------------------------------ |
| sub | JSON | key | Yes | The key field within `sub` must match your User ID key (for example, uid). |
| | | Value | Yes | The value field within `sub` must contain the User ID value you pass to the MoEngage SDK when calling the `changeUser` method. |
| exp | Int | NA | Yes | The expiration of when you want this token to expire (in epoch timestamp). |
The following is an example for JWT Token and Payload:
```json Example wrap theme={null}
JWT\_Token = 'eyJ0eXAiOiJKV1QiLCJhbGciOiJSUzI1NiJ9.eyJzdWIiOnsia2V5IjoidWlkIiwidmFsdWUiOiJ1c2VyQG1vZW5nYWdlLmNvbSJ9LCJleHAiOjE3NTgyNjA0NzZ9.Wonz61\_b89MZjUtPuvYC4WBTDt\_ahdbihscbQvhLlzWjCM6ud5SFLrrzoJJG3eZ7BRikVNV8\_ovaPPDmUtXu6Eba1j2MNrBC5ZK3ULv1MsYnhjUyX8puCfq4bdrYOvA1NSGIEjg\_HcS18Zm7oY9\_5QyrMANw2GpjnasfKsnUopbsfxjJN-oWJpJ5Kz6wY0kFfN1eW3oXvkPoP\_EuXk6fPgL0KSXOEBJyjB9f08pgLmGRKLg28y8tJk8j\_GLLopcU3dIO6SDfKIlhm7t7jqFbp2HK8JxDcRa7AsJ5HvufLrKRKdf5\_y6vcTjJc4VfJIjfvXQGpvt1oeUjz\_Mx8kyts28pzb2k3-sqE2QmPGFfGGVEHz9f2E\_\_xZZOBrSHxUEFnNGVioTXmhYzJFNz2nRiunpj1aYeCu0naU8qpxakB7DWglQgf3etdIxpOHnwnhKdikY1v03JIbKX1XOWwnLw4AeW1qtx4DkZlAcMkF0CYUQ0b7kEJYa-UglUVVNhl3W8puwkPxCvUvjutoBlpyrZqYBXikat6qmZgc9rfPQfR08zTz1xS-IOq3dmW43z3GwIAyToJni65aWHBAVr0qM\_jrEniyqTXBC4Nw9\_RiRildxZzdP2OLfF0-3lyL7886nKShH11szbDcqWlP13rTppQkucO5IiUcjw7eRlGk7rj6s'
jwt\_header: {
"alg": "RS256",
"typ": "JWT"
}
jwt\_payload:
{
"sub": {
"key": "uid",
"value": "user@moengage.com"
},
"exp": 1755112555
}
public\_key = """
-----BEGIN PUBLIC KEY-----
MIICIjANBgkqhkiG9w0BAQEFAAOCAg8AMIICCgKCAgEAkFOpbMqO3sgQHBwATjz3
YQG3WXRaaych06Rvvpmxw6vA+Tbv/9LCbptZvnxXrL/h4bkdlyXKwe3ViN3lZsKR
eDG/a/gm85Zkb04O+/DujiOuoP6djxrm5KbAS6PrRaY9aPCH5IfTlFJjjOjFK4oO
wx/RbWNco4Kkb4wnhkGzKUAjO7w575uRMMv4T+RvdgpixaWpj6G7rKp7fqByqXYw
23xWSUodF0JNM5SatgQ3S2Imwnf0/7aEoPOhRAkH3XyTR+qIE66nof+YLLgqlnYC
s01MR26haoANxqijYFKZqwRXKBMxiV+NiUX0PaZpcfL2enIfBD6rGiBq9vdDX7Yr
aqZnpt1AhEGFcKCI+7MvIkDSKJ3K/QRnLvaL92Cj7ZYcaNrhfPfmHOTmFGrpsuln
DsCGazJbzsi+jqfzSF5Ewoc6Pte9b5u521QKbP8SpPYN8wEIIbDB8ZMwCUuUMBDd
Oy9wELkORwhcKmjVhD2CPcbmidbxCkm/691KDP7nOeIau2jOiytc1Q7pmYr0RErj
GUx1IbtQRFBozxCwWJ1rn0k1Ngt8WLc/Tm+dUu5Gb5ChHYd1wLWd6QITzt1cihGI
emtk9uqqW92X4YV3O1u+AM+sScvVehErHGF3WcyFgTQE0ZSruy4pliOO1rfxxMLW
rzOm15jmMVTnueqsgGbkMx0CAwEAAQ==
-----END PUBLIC KEY-----
"""
```
## Access the SDK Authentication Page
To access to the SDK Authentication page, perform the following step:
1. On the left navigation menu in the MoEngage dashboard, click **Settings** > **Account** > **Security**.
2. On the **Security** page, select the **SDK Authentication** tab. 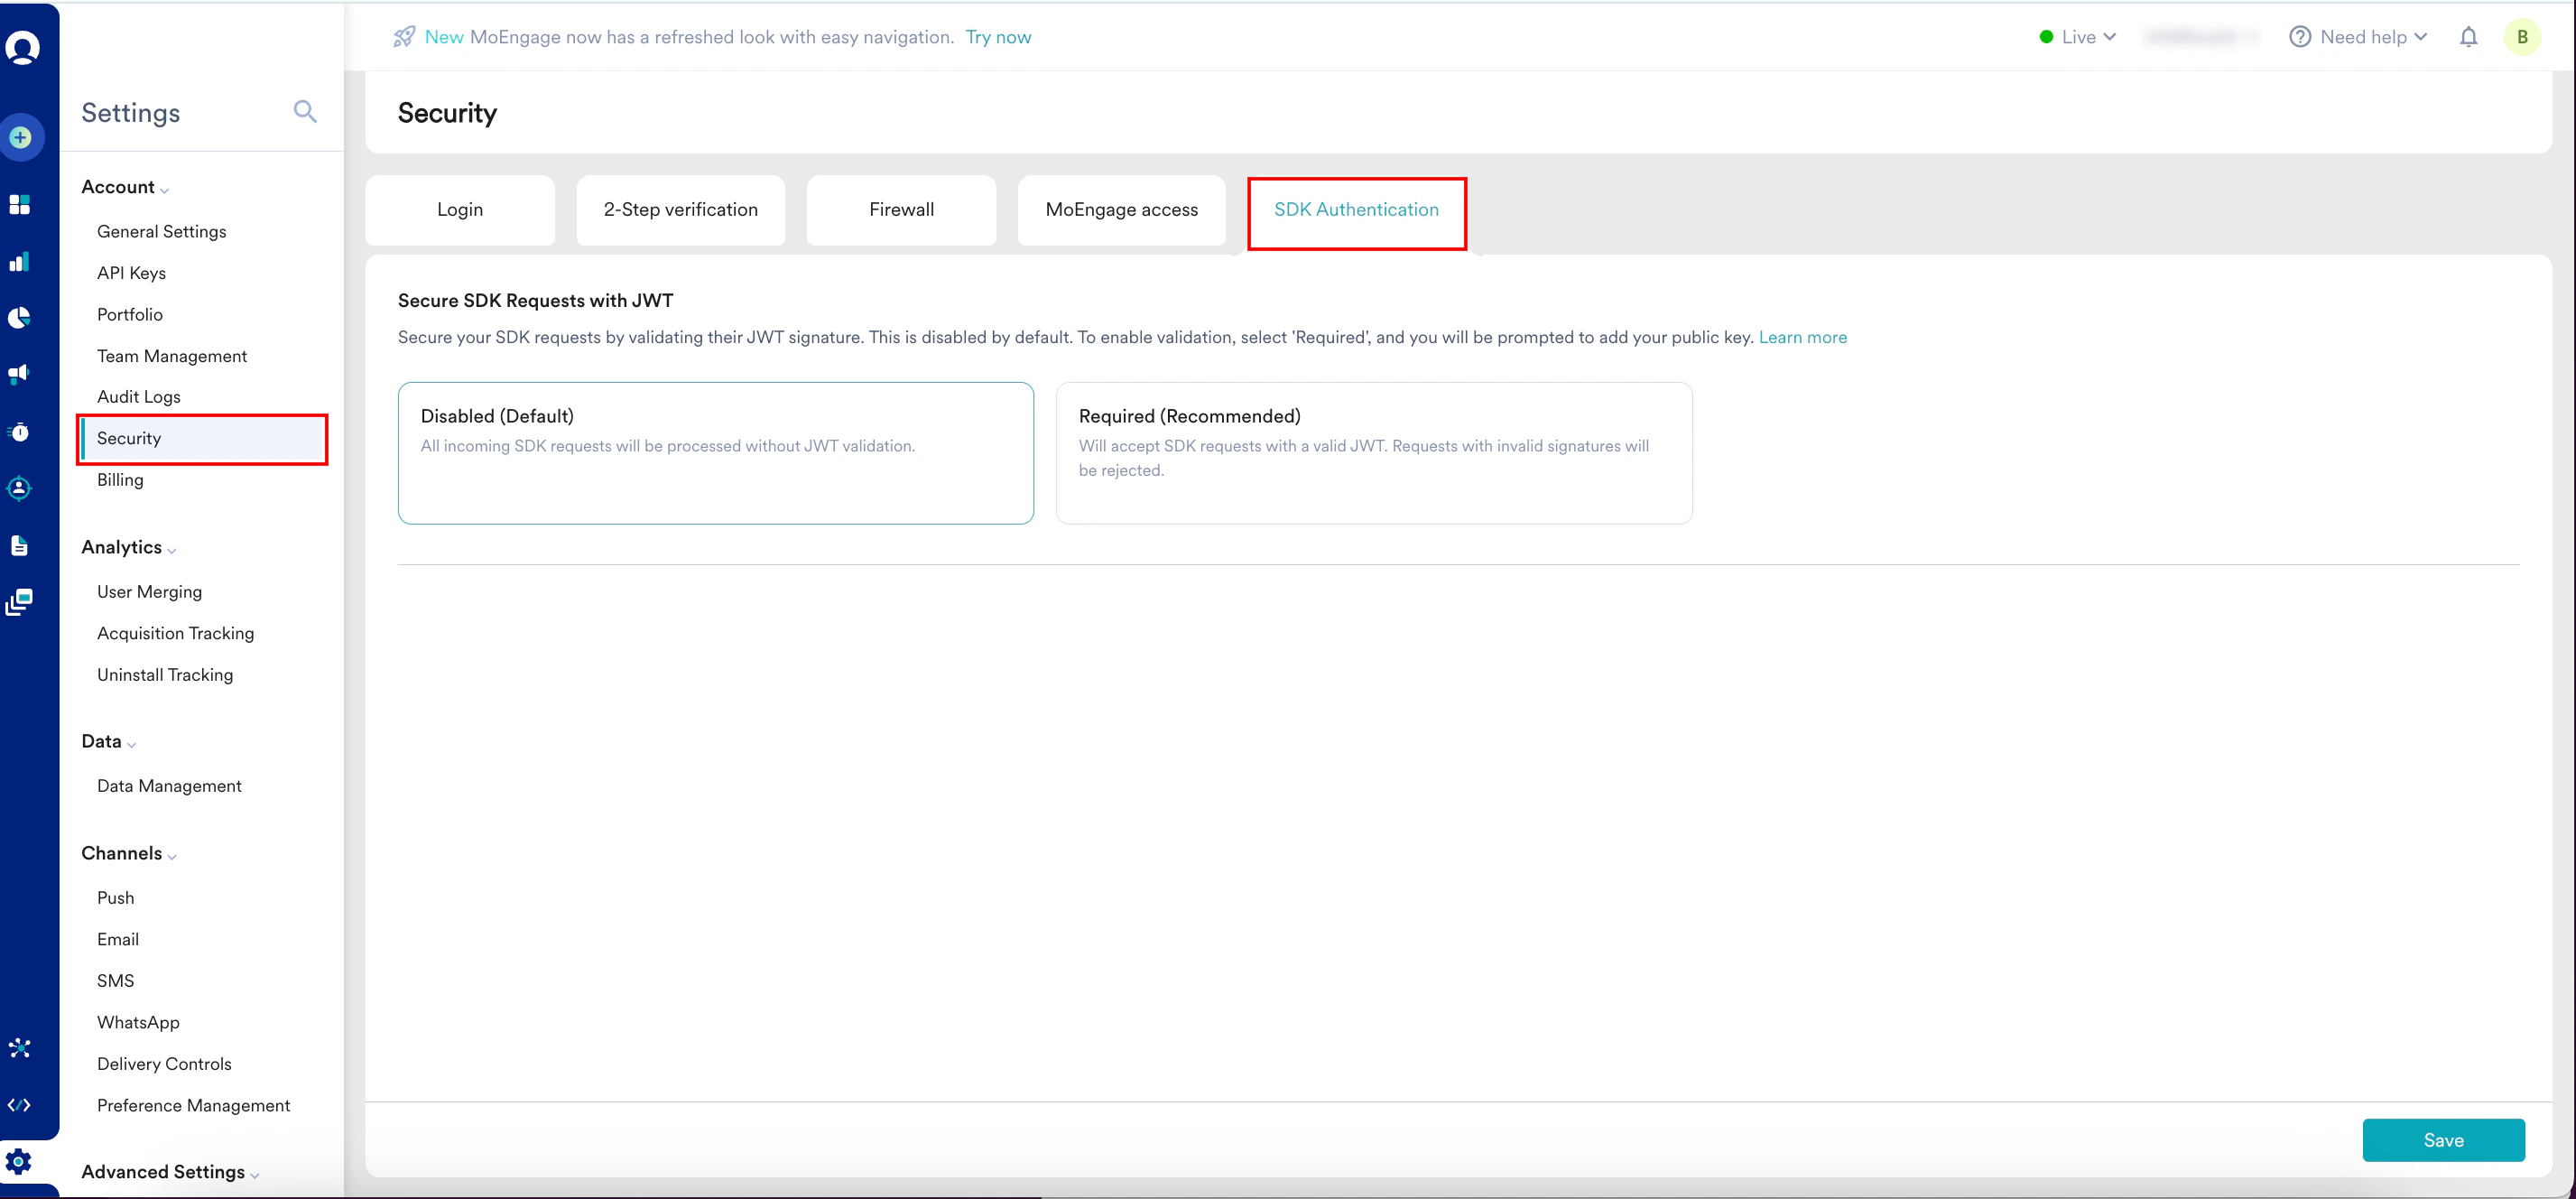 ## Permissions to access
| Capability | Permission Required | Description |
| --------------- | ----------------------------------------------------------------------------------------------------------------------------------------------------------------------------------- | ----------------------------------------------------------------------------------------------------------------------------------------------------------------- |
| Manage Settings | An Admin role or a custom role with Setup & manage permission for **Security Settings**.
## Permissions to access
| Capability | Permission Required | Description |
| --------------- | ----------------------------------------------------------------------------------------------------------------------------------------------------------------------------------- | ----------------------------------------------------------------------------------------------------------------------------------------------------------------- |
| Manage Settings | An Admin role or a custom role with Setup & manage permission for **Security Settings**.
**Note:** The **Login Settings** component is now renamed to **Security Settings**. | Grants complete administrative access. The user can add/delete public keys and change the enforcement mode (**Disabled (Default)** or **Required (Recommended**). |
# Configure SDK Authentication
Follow the steps below to configure and enable JWT authentication for your account:
### Step 1: Meet Prerequisites
Before you begin the JWT authentication, ensure you have the following:
1. **MoEngage SDK Integration**: Ensure your development team has integrated the latest version of the MoEngage SDK into your application. For more information, refer to the following platform documentation:
* [Android](https://developers.moengage.com/hc/en-us/articles/41744123091604-JWT-Authentication#01H8G7608SJSJG47JWWDNNFKGM)
* [iOS](https://developers.moengage.com/hc/en-us/articles/42128179595796-JWT-Authentication#01H8G7608SJSJG47JWWDNNFKGM)
2. **Public and Private Key Pair**: A key pair must be generated that meets the technical requirements below. The **Private Key** must be stored securely on your server, while the **Public Key** will be uploaded to the MoEngage dashboard.
| Requirement | Specification |
| ----------- | -------------------------------------------------------------------------------------------------------------------------------------------- |
| Format | Must be in the standard Privacy Enhanced Mail (PEM) format, enclosed within -----BEGIN PUBLIC KEY----- and -----END PUBLIC KEY----- headers. |
| Content | The string between the headers must be a valid, non-empty Base64 encoded key. |
| Algorithm | MoEngage supports RSA256 and RSA512. It is mandatory to be mentioned in the JWT header. |
| Security | The RSA key must have a minimum size of 2048 bits. |
Remember to keep your private keys private. Never expose or hard-code your private key in your app or website. Anyone who knows your private key can impersonate or create users on behalf of your application.
### Step 2: Select an Enforcement Mode
Select the enforcement mode for validating SDK requests:
1. In the **Secure SDK Requests with JWT** section, select one of the three enforcement modes
* **Disabled (Default)**: This is the default state. No authentication is performed. All SDK requests are processed.
* **Required (Recommended)**: MoEngage strictly validates all requests and rejects any request with a missing or invalid signature. Enable this only after successful testing.  MoEngage recommends **Required (Recommended)** mode. Before you enable **Required (Recommended)** mode, ensure your development team has fully rolled out the updated app to your users. After this mode is active, any data sent from older app versions that do not have the JWT signature will be permanently blocked.
### Step 3: Add Your Public Key
If you select **Required (Recommended)**, you will be prompted to add your public key.
1. In the **Public key details** section, paste your key in the **Enter public key** box.
2. Type a descriptive name in the **Enter description (optional)** box to help you identify the key.
MoEngage recommends **Required (Recommended)** mode. Before you enable **Required (Recommended)** mode, ensure your development team has fully rolled out the updated app to your users. After this mode is active, any data sent from older app versions that do not have the JWT signature will be permanently blocked.
### Step 3: Add Your Public Key
If you select **Required (Recommended)**, you will be prompted to add your public key.
1. In the **Public key details** section, paste your key in the **Enter public key** box.
2. Type a descriptive name in the **Enter description (optional)** box to help you identify the key. 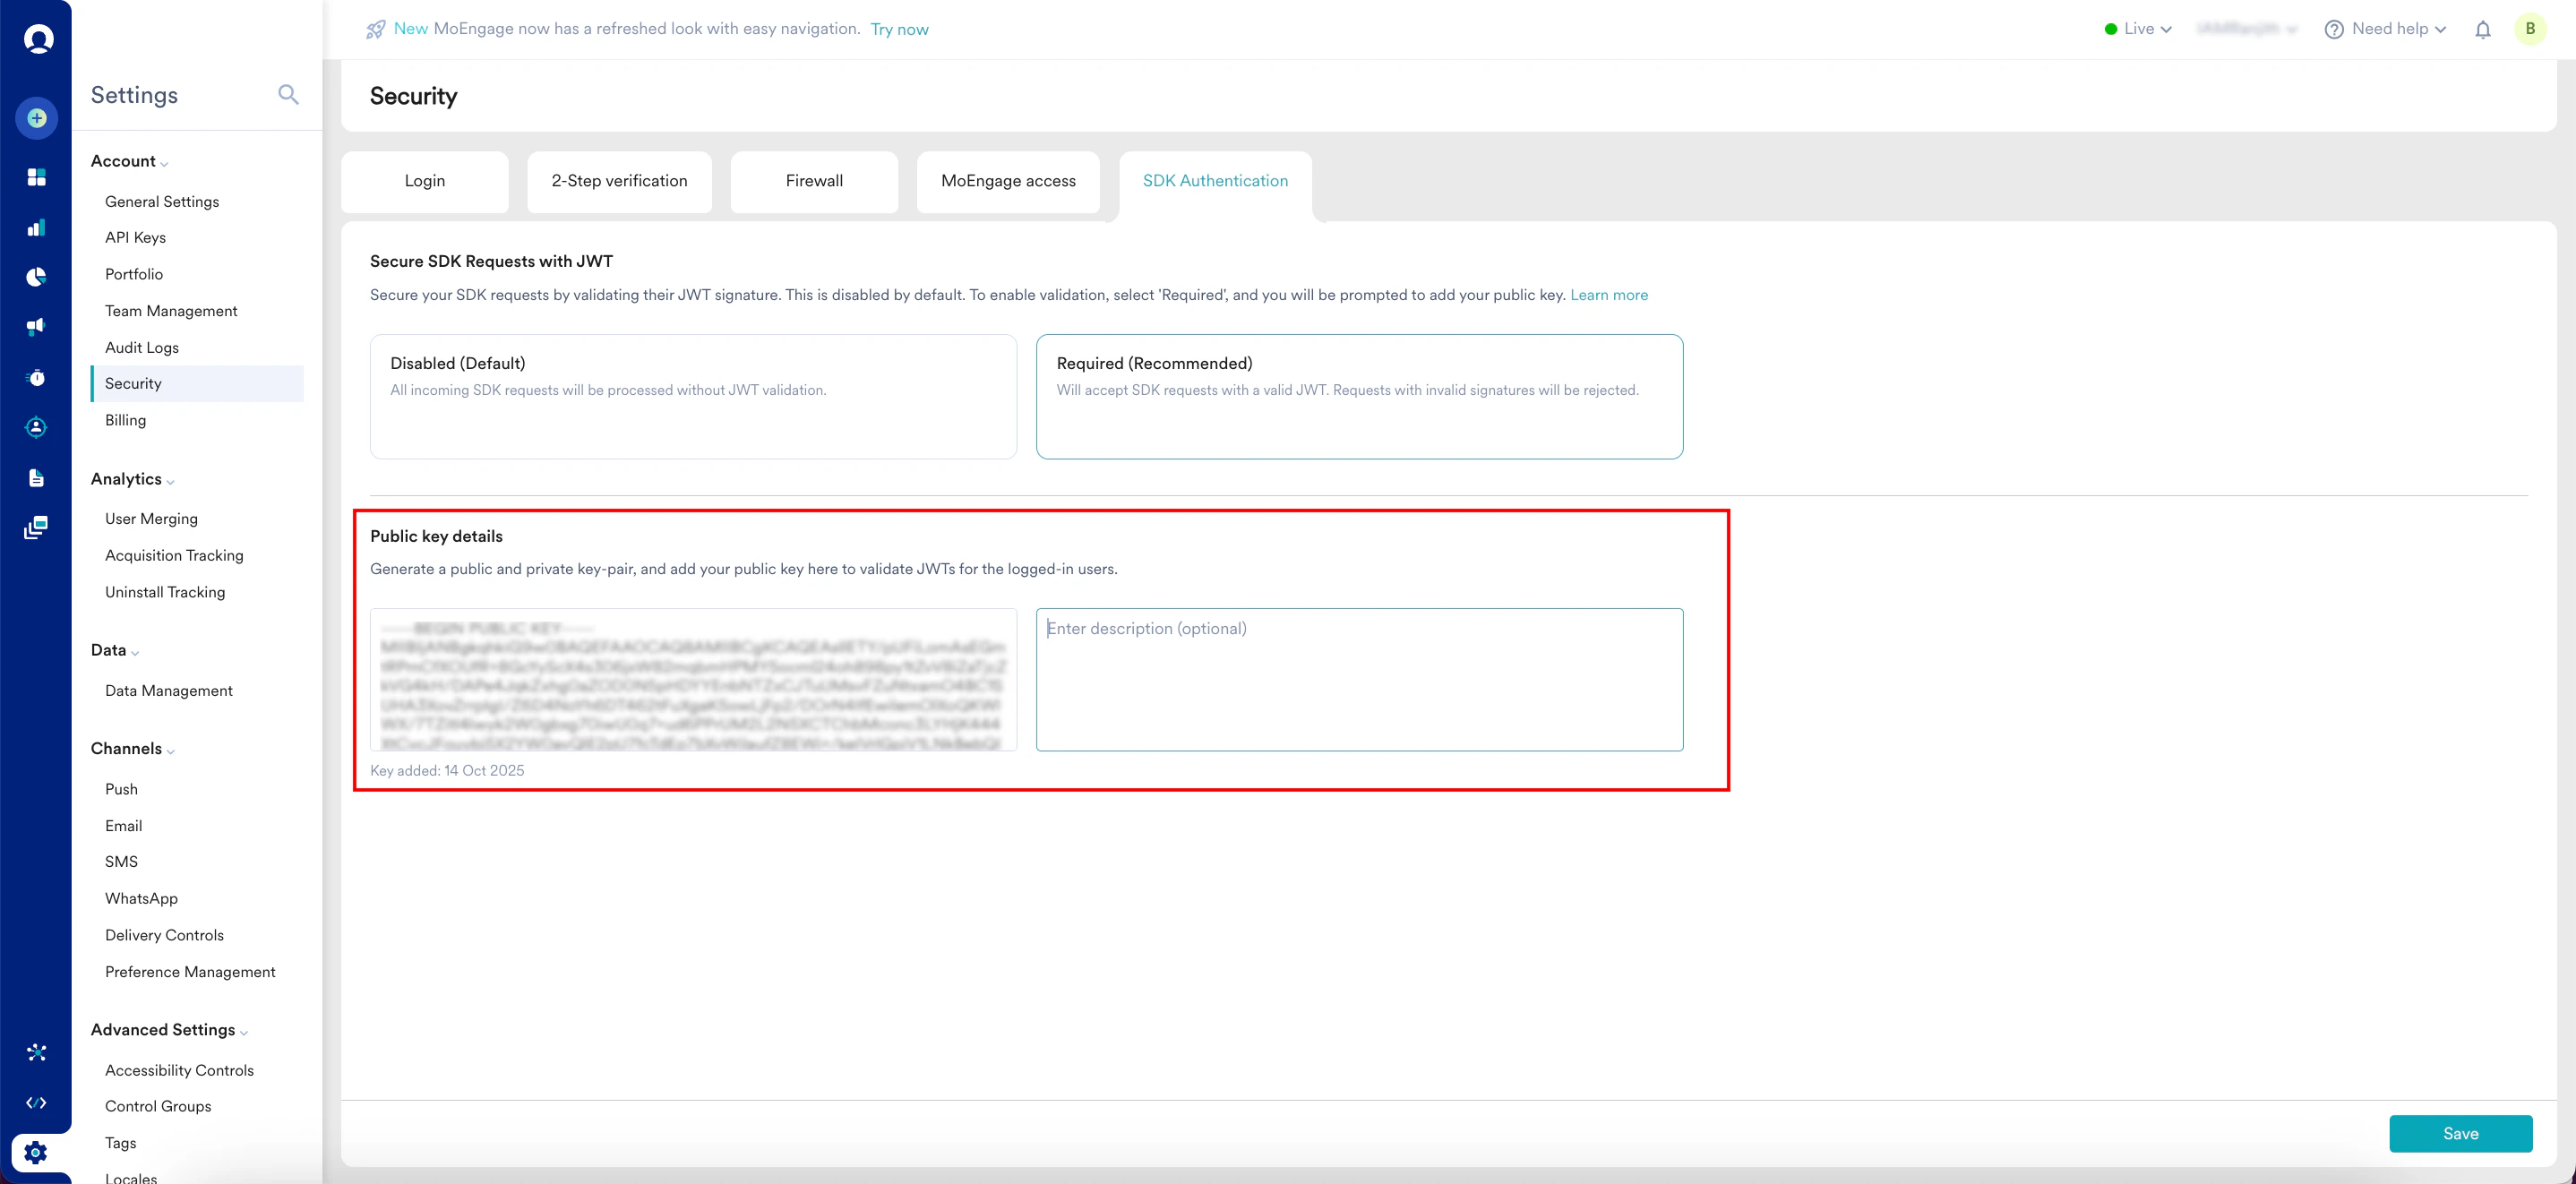 ### Step 4: Save and Confirm
Finally, save your settings to activate the configuration.
1. In the bottom-right corner of the page, click **Save**.\
The **Update your configuration** dialog box appears.
2. Click **Confirm** to apply your configuration.
### Step 4: Save and Confirm
Finally, save your settings to activate the configuration.
1. In the bottom-right corner of the page, click **Save**.\
The **Update your configuration** dialog box appears.
2. Click **Confirm** to apply your configuration.  Your configuration is saved successfully.
# FAQs
Data sent from older app versions that don't have SDK authentication will be rejected and permanently lost. We strongly recommend you ensure most of your users have upgraded to the latest app version before enabling this mode.
If you encounter an integration issue, you can immediately return to the MoEngage dashboard and set the enforcement mode back to **Disabled**. This will allow unauthenticated data to be collected again while your team resolves the server-side issue.
This method provides higher security. With a public/private key pair, the secret (your private key) never leaves your server. Not even MoEngage has access to it, which prevents anyone from impersonating your users.
No. SDK authentication is designed to verify requests only from known, logged-in users. Data from anonymous users will be processed without authentication.
Your configuration is saved successfully.
# FAQs
Data sent from older app versions that don't have SDK authentication will be rejected and permanently lost. We strongly recommend you ensure most of your users have upgraded to the latest app version before enabling this mode.
If you encounter an integration issue, you can immediately return to the MoEngage dashboard and set the enforcement mode back to **Disabled**. This will allow unauthenticated data to be collected again while your team resolves the server-side issue.
This method provides higher security. With a public/private key pair, the secret (your private key) never leaves your server. Not even MoEngage has access to it, which prevents anyone from impersonating your users.
No. SDK authentication is designed to verify requests only from known, logged-in users. Data from anonymous users will be processed without authentication.