> ## Documentation Index
> Fetch the complete documentation index at: https://moengage-user-guide.mintlify.site/llms.txt
> Use this file to discover all available pages before exploring further.
# Data Management Alerts
* Data Management Alerts feature is only available if you have Alert Management enabled for your workspace.
* Note that only roles with permission to create custom alerts can view and edit alerts. For more information, refer to [Access Roles](/user-guide/settings/account/team-management/access-roles).
# Overview
Data management alerts are notifications or warnings triggered by certain conditions related to the usage or volume of events and user attributes in the data management dashboard of your MoEngage workspace. As a marketer, you can use these alerts to monitor and manage your data effectively, ensuring its quality, integrity, security, and compliance.
The following are the use cases that can be fulfilled using data management alerts:
* Monitor the event and user attribute usage proactively, thereby complying with your workspace's [Data Tracking Policies](/user-guide/data/key-concepts/data-tracking-policies). When you set up usage alerts, you are notified based on your event and user attribute usage.
* Validate the configuration of your data integration with MoEngage. Incorrect configuration of the data integration results in unnecessary event data flow to MoEngage. Setting up event volume alerts lets you know if such a flow occurs.
You can access this feature from **Settings** > **Analytics and Data** > **Data Management**.
# Create a Usage Alert
This option allows you to create alerts based on the usage of data. You can create alerts for event usage and user attribute usage. Perform the following steps to create an event usage alert:
1. In the **Data Management** dashboard, click on the **Unique events used** or **Unique user attributes used** card. 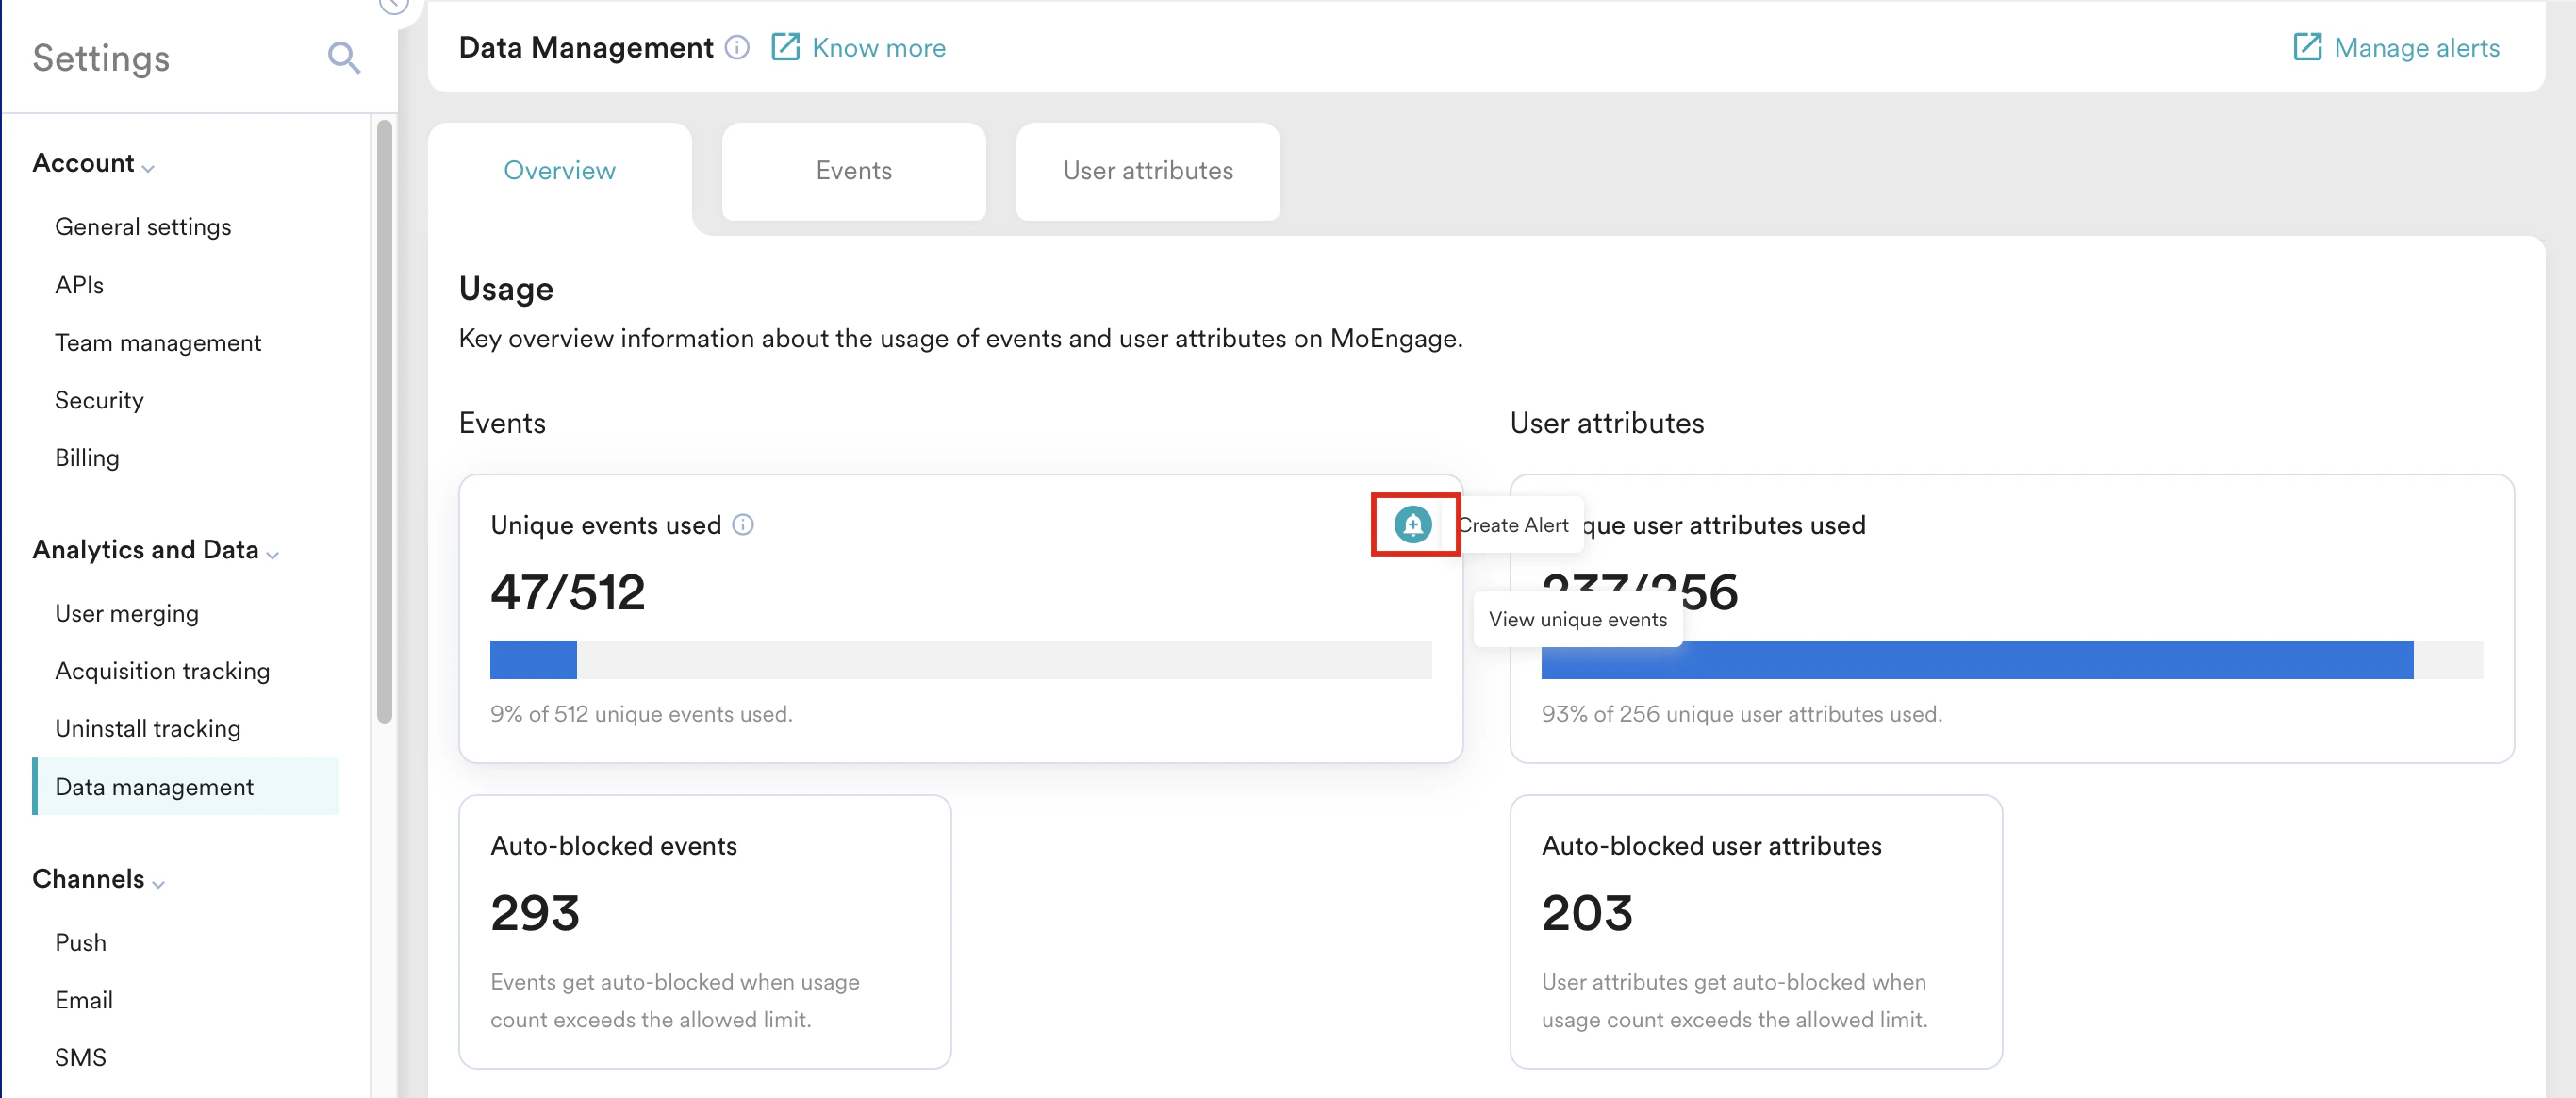 2. In the **Create alert - Event usage** dialog box, enter the following details:
  1. In the **General details** section, enter the following details:
1. **Alert name**: Type a name for your usage alert for easy identification.
2. **Send alert via**: By default, you can send alerts through **Email.** This field is auto-populated.
2. In the **Alert condition** section, create a condition for receiving alerts. When the data usage meets this condition, an alert is received.
1. In the **Send alerts when** list, select the type of usage for which you want to create an alert. The type of usage can be **Event usage**, **User attribute usage**. By default, **Event usage** is auto-populated.
2. By default, **Is greater than** is the supported operator. This field is auto-populated.
3. Select the usage limit above which you want to receive the alert.
1. When you select **Event usage**, by default, **511** is auto-populated because your default limit is 512. Any value greater than 511 means you have reached event usage limit. However, a system alert is configured by default when you reach 100 percent of your event usage limit.
2. When you select **User attribute usage**, by default, **255** is auto-populated because your default limit is 256. Any value greater than 255 means you have reached user attribute usage limit. However, a system alert is configured by default when you reach 100 percent of your user attribute usage limit.
The alert condition you build is evaluated daily, and alerts will be sent every time the condition is met.
3. In the **Members** list, select the members to whom the alert is to be sent. This list displays all the members in your current workspace.
3. Click **Save Alert**.
4. After saving, to manage the created alerts, click **Manage alerts** at the upper-right corner of the screen. For more information, refer to [Manage alerts](/user-guide/settings/reports-and-alerts/alert-management/manage-alerts/managing-alerts).
You can also create the usage alert using the **Create Alert** option on the **Alert Management** page. While creating, make sure to select the **Create Alerts On** as **Events and User Attribute Usage**. For more information, refer to [Create Alert](/user-guide/settings/reports-and-alerts/alert-management/getting-started/create-an-alert).
# Create an Event Volume Alert
This option allows you to create alerts based on the volume of events. You can create alerts for All events, All custom events, All system events, and Individual events. Perform the following steps to create an event volume alert:
1. In the **Data Management** dashboard, click on the **Event volume (All events)** or **Event volume (Custom events)** card.
1. In the **General details** section, enter the following details:
1. **Alert name**: Type a name for your usage alert for easy identification.
2. **Send alert via**: By default, you can send alerts through **Email.** This field is auto-populated.
2. In the **Alert condition** section, create a condition for receiving alerts. When the data usage meets this condition, an alert is received.
1. In the **Send alerts when** list, select the type of usage for which you want to create an alert. The type of usage can be **Event usage**, **User attribute usage**. By default, **Event usage** is auto-populated.
2. By default, **Is greater than** is the supported operator. This field is auto-populated.
3. Select the usage limit above which you want to receive the alert.
1. When you select **Event usage**, by default, **511** is auto-populated because your default limit is 512. Any value greater than 511 means you have reached event usage limit. However, a system alert is configured by default when you reach 100 percent of your event usage limit.
2. When you select **User attribute usage**, by default, **255** is auto-populated because your default limit is 256. Any value greater than 255 means you have reached user attribute usage limit. However, a system alert is configured by default when you reach 100 percent of your user attribute usage limit.
The alert condition you build is evaluated daily, and alerts will be sent every time the condition is met.
3. In the **Members** list, select the members to whom the alert is to be sent. This list displays all the members in your current workspace.
3. Click **Save Alert**.
4. After saving, to manage the created alerts, click **Manage alerts** at the upper-right corner of the screen. For more information, refer to [Manage alerts](/user-guide/settings/reports-and-alerts/alert-management/manage-alerts/managing-alerts).
You can also create the usage alert using the **Create Alert** option on the **Alert Management** page. While creating, make sure to select the **Create Alerts On** as **Events and User Attribute Usage**. For more information, refer to [Create Alert](/user-guide/settings/reports-and-alerts/alert-management/getting-started/create-an-alert).
# Create an Event Volume Alert
This option allows you to create alerts based on the volume of events. You can create alerts for All events, All custom events, All system events, and Individual events. Perform the following steps to create an event volume alert:
1. In the **Data Management** dashboard, click on the **Event volume (All events)** or **Event volume (Custom events)** card.  2. In the **Create alert - Event volume** dialog box, enter the following details:
  1. In the **General details** section, enter the following details:
1. **Alert name**: Type a name for your usage alert for easy identification.
2. **Send alert via**: By default, you can send alerts through **Email.** This field is auto-populated.
2. In the **Alert condition** section, in the **Events** list, select the type of event for which you want to create an alert. Following are the types of events in the list:
1. In the **General details** section, enter the following details:
1. **Alert name**: Type a name for your usage alert for easy identification.
2. **Send alert via**: By default, you can send alerts through **Email.** This field is auto-populated.
2. In the **Alert condition** section, in the **Events** list, select the type of event for which you want to create an alert. Following are the types of events in the list:  * **All events**: Allows you to create alerts for all events, including custom and system events.
* **All custom events**: Allows you to create alerts for all custom events,which are events that you track.
* **All system events**: Allows you to create alerts for all system events, which are events that MoEngage tracks by default.
* **Individual event**: Allows you to create alerts for a particular event, which can be a custom or system event.
3. In the **Send alerts when event volume for the selected event(s)** section, create a condition for receiving alerts. When the event volume meets this condition, an alert is received.
1. **Select operator** from the list. The following operators are supported:
* **Is greater than**: Allows you to set an alert when the event volume is greater than the entered value. After selecting this operator, select the following values:
* **All events**: Allows you to create alerts for all events, including custom and system events.
* **All custom events**: Allows you to create alerts for all custom events,which are events that you track.
* **All system events**: Allows you to create alerts for all system events, which are events that MoEngage tracks by default.
* **Individual event**: Allows you to create alerts for a particular event, which can be a custom or system event.
3. In the **Send alerts when event volume for the selected event(s)** section, create a condition for receiving alerts. When the event volume meets this condition, an alert is received.
1. **Select operator** from the list. The following operators are supported:
* **Is greater than**: Allows you to set an alert when the event volume is greater than the entered value. After selecting this operator, select the following values:  1. In the **Select value** list, select the event volume for which you want to receive the alert.
2. In the **Select duration** list, select the frequency of the alert. The following frequencies are supported:
* **in a calendar month**: Allows you to set up the frequency of alerts for each day in a month.\
For example, if you select the event volume as **90,** the operator **Is greater than,** and you create an alert on December 9, the system checks from December 1 to December to see if the cumulative event volume is greater than 90. Starting the next day December 10), the system checks again from December 1 to December 10 to see if the cumulative event volume is greater than 90. This continues till December 31, and an alert is sent whenever the cumulative event volume is greater than 90. If the condition is met before the end of the calendar month, alerts will be sent daily for the remaining days of the month.\
Note that the alert condition evaluation is reset at the start of the month.
* **in a calendar week (Sun-Sat)**: Allows you to set up the frequency of alerts within a week\
For example, if you select the event volume as **90,** the operator **Is greater than,** and you create an alert on Monday, the system checks from Sunday to Monday to see if the cumulative event volume is greater than 90. Starting the next day (Tuesday), the system checks again from Sunday to Tuesday to see if the cumulative event volume is greater than 90. This continues till Saturday, and an alert is sent whenever the cumulative event volume is greater than 90. If the condition is met before the end of the calendar week, alerts will be sent daily for the remaining days of the week.\
Note that the alert condition evaluation is reset at the start of the week (Sunday).
* **in a day**: Allows you to set up the frequency of alerts within a day.\
For example, if you select the event volume as **90,** the operator **Is greater than** then members are alerted as soon as the event volume is greater than 90 within a day.
* **Is less than:** Allows you to set an alert when the event volume is less than the entered value. After selecting this operator, select the following values:
1. In the **Select value** list, select the event volume for which you want to receive the alert.
2. In the **Select duration** list, select the frequency of the alert. The following frequencies are supported:
* **in a calendar month**: Allows you to set up the frequency of alerts for each day in a month.\
For example, if you select the event volume as **90,** the operator **Is greater than,** and you create an alert on December 9, the system checks from December 1 to December to see if the cumulative event volume is greater than 90. Starting the next day December 10), the system checks again from December 1 to December 10 to see if the cumulative event volume is greater than 90. This continues till December 31, and an alert is sent whenever the cumulative event volume is greater than 90. If the condition is met before the end of the calendar month, alerts will be sent daily for the remaining days of the month.\
Note that the alert condition evaluation is reset at the start of the month.
* **in a calendar week (Sun-Sat)**: Allows you to set up the frequency of alerts within a week\
For example, if you select the event volume as **90,** the operator **Is greater than,** and you create an alert on Monday, the system checks from Sunday to Monday to see if the cumulative event volume is greater than 90. Starting the next day (Tuesday), the system checks again from Sunday to Tuesday to see if the cumulative event volume is greater than 90. This continues till Saturday, and an alert is sent whenever the cumulative event volume is greater than 90. If the condition is met before the end of the calendar week, alerts will be sent daily for the remaining days of the week.\
Note that the alert condition evaluation is reset at the start of the week (Sunday).
* **in a day**: Allows you to set up the frequency of alerts within a day.\
For example, if you select the event volume as **90,** the operator **Is greater than** then members are alerted as soon as the event volume is greater than 90 within a day.
* **Is less than:** Allows you to set an alert when the event volume is less than the entered value. After selecting this operator, select the following values:  1. In the **Select value** list, select the event volume by which you want to receive the alert.
2. In the **Select duration** list, select the frequency of the alert. The following frequencies are supported:
* **in a calendar month**: Allows you to set up the frequency of alerts within the time frame of a calendar month.\
For example, if you select the event volume as **90,** the operator **Is less than,** and you create an alert on December 9, the system checks from December 1 to December 9 to see if the cumulative event volume is less than 90. Starting the next day (Dec 10), the system checks again from December 1 to December 10 to see if the cumulative event volume is less than 90. This continues till December 31, and an alert is sent whenever the cumulative event volume is less than 90. If the condition is met before the end of the calendar month, alerts will be sent daily for the remaining days of the month. Note that the alert condition evaluation is reset at the start of the month.
* **in a calendar week (Sun-Sat)**: Allows you to set up the frequency of alerts within the time frame of a calendar week.\
For example, if you select the event volume as **90,** the operator **Is less than,** and you create an alert on Monday, the system checks from Sunday to Monday to see if the cumulative event volume is less than 90. Starting the next day (Tuesday), the system checks again from Sunday to Tuesday to see if the cumulative event volume is less than 90. This continues till Saturday, and an alert is sent whenever the cumulative event volume is less than 90. If the condition is met before the end of the calendar week, alerts will be sent daily for the remaining days of the week.\
Note that the alert condition evaluation is reset at the start of the week (Sunday).
* **in a day**: Allows you to set up the frequency of alerts within a day.\
For example, if you select the event volume as **90,** the operator **Is less than** then members are alerted as soon as the event volume is less than 90 within a day.
* **Increases by:** Allows you to set an alert when the event volume increases by a specified percentage compared to the average event volume of specified previous days. After selecting this operator, select the following values:
1. In the **Select value** list, select the event volume by which you want to receive the alert.
2. In the **Select duration** list, select the frequency of the alert. The following frequencies are supported:
* **in a calendar month**: Allows you to set up the frequency of alerts within the time frame of a calendar month.\
For example, if you select the event volume as **90,** the operator **Is less than,** and you create an alert on December 9, the system checks from December 1 to December 9 to see if the cumulative event volume is less than 90. Starting the next day (Dec 10), the system checks again from December 1 to December 10 to see if the cumulative event volume is less than 90. This continues till December 31, and an alert is sent whenever the cumulative event volume is less than 90. If the condition is met before the end of the calendar month, alerts will be sent daily for the remaining days of the month. Note that the alert condition evaluation is reset at the start of the month.
* **in a calendar week (Sun-Sat)**: Allows you to set up the frequency of alerts within the time frame of a calendar week.\
For example, if you select the event volume as **90,** the operator **Is less than,** and you create an alert on Monday, the system checks from Sunday to Monday to see if the cumulative event volume is less than 90. Starting the next day (Tuesday), the system checks again from Sunday to Tuesday to see if the cumulative event volume is less than 90. This continues till Saturday, and an alert is sent whenever the cumulative event volume is less than 90. If the condition is met before the end of the calendar week, alerts will be sent daily for the remaining days of the week.\
Note that the alert condition evaluation is reset at the start of the week (Sunday).
* **in a day**: Allows you to set up the frequency of alerts within a day.\
For example, if you select the event volume as **90,** the operator **Is less than** then members are alerted as soon as the event volume is less than 90 within a day.
* **Increases by:** Allows you to set an alert when the event volume increases by a specified percentage compared to the average event volume of specified previous days. After selecting this operator, select the following values:  1. In the **Enter value** list, select the increase in event volume percentage for which you want to receive the alert.
2. Select the number of previous days for which you want to compare the specified increase in event volume.\
For example, if you select the event volume percentage as 50 and the number of previous day as 10, the condition is *Members will be alerted as soon as the event volume increases by 50% compared to the event volume of the previous 10 day(s)*.
* **Decreases by:** Allows you to set an alert when the event volume decreases by a specified percentage compared to the average event volume of specified previous days. After selecting this operator, select the following values:
1. In the **Enter value** list, select the increase in event volume percentage for which you want to receive the alert.
2. Select the number of previous days for which you want to compare the specified increase in event volume.\
For example, if you select the event volume percentage as 50 and the number of previous day as 10, the condition is *Members will be alerted as soon as the event volume increases by 50% compared to the event volume of the previous 10 day(s)*.
* **Decreases by:** Allows you to set an alert when the event volume decreases by a specified percentage compared to the average event volume of specified previous days. After selecting this operator, select the following values:  1. In the **Enter value** list, select the decrease in event volume percentage for which you want to receive the alert.
2. Select the number of previous days for which you want to compare the specified decrease in event volume.\
For example, if you select the event volume percentage as 50 and the number of previous data as 10, the condition is *Members will be alerted as soon as the event volume decreases by 50% compared to the event volume of the previous 10 day(s)*.
4. In the **Members** list, select the members to whom the alert is to be sent. This list displays all the members in your current workspace.
3. Click **Save Alert**.
4. After saving, to manage the created alerts, click **Manage alerts** at the upper-right corner of the screen. For more information, refer to [Manage alerts](/user-guide/settings/reports-and-alerts/alert-management/manage-alerts/managing-alerts).
You can also create the event volume alert using the **Create Alert** option in **Alert Management** page. While creating, make sure to select the **Create Alerts On** as **Events Volume**. For more information, refer to [Create Alert](/user-guide/settings/reports-and-alerts/alert-management/getting-started/create-an-alert).
# Create User Volume Alert
This option allows you to create alerts based on the user volume. You can create alerts for the volume of users who use both web and mobile. Perform the following steps to create user volume alerts:
1. In the **Data Management** dashboard, click on the **Web user volume (30-day)** or **Mobile user volume (30-day)** card.
1. In the **Enter value** list, select the decrease in event volume percentage for which you want to receive the alert.
2. Select the number of previous days for which you want to compare the specified decrease in event volume.\
For example, if you select the event volume percentage as 50 and the number of previous data as 10, the condition is *Members will be alerted as soon as the event volume decreases by 50% compared to the event volume of the previous 10 day(s)*.
4. In the **Members** list, select the members to whom the alert is to be sent. This list displays all the members in your current workspace.
3. Click **Save Alert**.
4. After saving, to manage the created alerts, click **Manage alerts** at the upper-right corner of the screen. For more information, refer to [Manage alerts](/user-guide/settings/reports-and-alerts/alert-management/manage-alerts/managing-alerts).
You can also create the event volume alert using the **Create Alert** option in **Alert Management** page. While creating, make sure to select the **Create Alerts On** as **Events Volume**. For more information, refer to [Create Alert](/user-guide/settings/reports-and-alerts/alert-management/getting-started/create-an-alert).
# Create User Volume Alert
This option allows you to create alerts based on the user volume. You can create alerts for the volume of users who use both web and mobile. Perform the following steps to create user volume alerts:
1. In the **Data Management** dashboard, click on the **Web user volume (30-day)** or **Mobile user volume (30-day)** card. 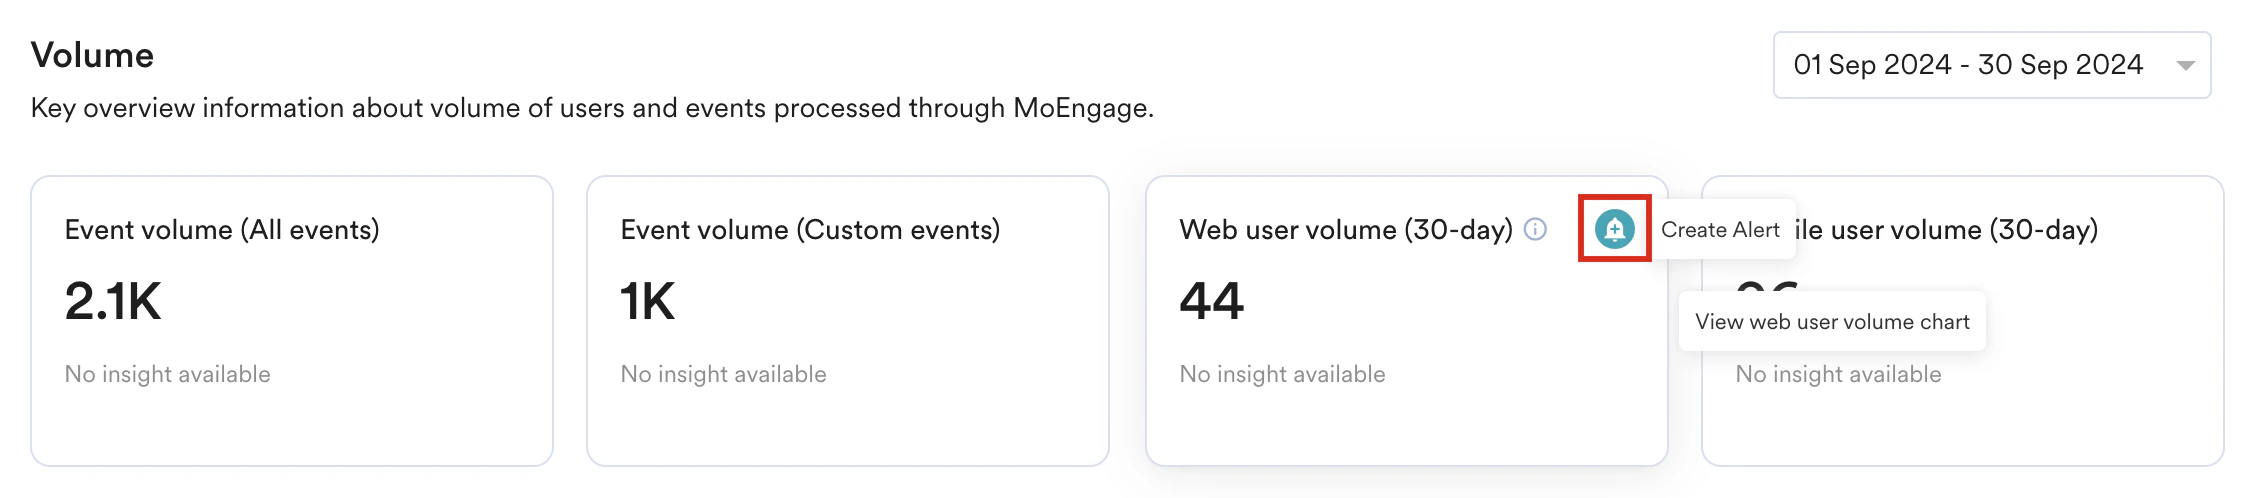 2. In the **Create alert - User volume** dialog box, enter the following details:
  1. In the **General details** section, type the following details:
1. **Alert name**: Type a name for your usage alert for easy identification.
2. **Send alert via**: By default, you can send alerts through **Email.** This field is auto-populated.
2. In the **Alert condition** section, the **User metric** is auto-populated as **Tracked users (Web+Mobile)**.
3. In the **Send alerts when selected metric** section, create a condition for receiving alerts. When the user volume meets this condition, an alert is received.
1. By default, **Is greater than** is the supported operator. This field is auto-populated.
2. Select the user volume by which you want to receive the alert.
3. By default, the frequency **in a calender month** is supported. This field is auto-populated. This option allows you to configure the frequency of alerts within a month.\
For example, if you select the user volume as **90**, and you create an alert on December 9, the system checks from December 1 to December 9 to see if the cumulative user volume is greater than 90. Starting the next day (December 10), the system checks again from December 1 to December 10 to see if the cumulative user volume is greater than 90. This continues till December 31, and an alert is sent whenever the cumulative user volume is greater than 90. If the condition is met before the end of the calendar month, alerts will be sent daily for the remaining days of the month.\
Note that the alert condition evaluation is reset at the start of the month.
4. In the **Members** list, select the members to whom the alert is to be sent. This list displays all the members in your current workspace.
3. Click **Save Alert**.
4. After saving, to manage the created alerts, click **Manage alerts** at the upper-right corner of the screen. For more information, refer to [Manage alerts](/user-guide/settings/reports-and-alerts/alert-management/manage-alerts/managing-alerts).
You can also create the user volume alert using the **Create Alert** option on the **Alert Management** page. While creating, make sure to select the **Create Alerts On** as **Active Users Volume**. For more information, refer to [Create Alert](/user-guide/settings/reports-and-alerts/alert-management/manage-alerts/managing-alerts).
1. In the **General details** section, type the following details:
1. **Alert name**: Type a name for your usage alert for easy identification.
2. **Send alert via**: By default, you can send alerts through **Email.** This field is auto-populated.
2. In the **Alert condition** section, the **User metric** is auto-populated as **Tracked users (Web+Mobile)**.
3. In the **Send alerts when selected metric** section, create a condition for receiving alerts. When the user volume meets this condition, an alert is received.
1. By default, **Is greater than** is the supported operator. This field is auto-populated.
2. Select the user volume by which you want to receive the alert.
3. By default, the frequency **in a calender month** is supported. This field is auto-populated. This option allows you to configure the frequency of alerts within a month.\
For example, if you select the user volume as **90**, and you create an alert on December 9, the system checks from December 1 to December 9 to see if the cumulative user volume is greater than 90. Starting the next day (December 10), the system checks again from December 1 to December 10 to see if the cumulative user volume is greater than 90. This continues till December 31, and an alert is sent whenever the cumulative user volume is greater than 90. If the condition is met before the end of the calendar month, alerts will be sent daily for the remaining days of the month.\
Note that the alert condition evaluation is reset at the start of the month.
4. In the **Members** list, select the members to whom the alert is to be sent. This list displays all the members in your current workspace.
3. Click **Save Alert**.
4. After saving, to manage the created alerts, click **Manage alerts** at the upper-right corner of the screen. For more information, refer to [Manage alerts](/user-guide/settings/reports-and-alerts/alert-management/manage-alerts/managing-alerts).
You can also create the user volume alert using the **Create Alert** option on the **Alert Management** page. While creating, make sure to select the **Create Alerts On** as **Active Users Volume**. For more information, refer to [Create Alert](/user-guide/settings/reports-and-alerts/alert-management/manage-alerts/managing-alerts).