Use Cases
- Failure rate exceeding a threshold If you want to be alerted when a campaign’s failure rate exceeds a specified threshold within a custom time window, you can set alerts to ensure timely corrective actions. For example, you set an alert for a campaign’s failure rate exceeding 10% in the last 6 hours, ensuring quick resolution when the threshold is breached.
- Unsubscribe rate exceeding a threshold Suppose you want to monitor unsubscribe rates over extended periods; you can set custom alerts to notify you when the rate exceeds a defined threshold, enabling proactive adjustments. For example, you set an alert for an unsubscribe rate exceeding 0.5% over 3 days, ensuring you can adjust the campaign when needed.
- Failure rate increase compared to historical data If you want to track deviations in campaign performance, set alerts comparing real-time failure rates with historical averages to receive early warnings of significant changes. For example, you set an alert for failure rates increasing by more than 10% compared to the last 90 hours, ensuring quick action if performance deviates.
Create an Alert
You can create alerts from the Alert Management dashboard in MoEngage. However, you cannot create System Alerts. MoEngage offers role-based access control for account admins to enable different levels of access permissions (to dashboard components) for your team members. Only those roles that have permission to create custom alerts can do so. For more information, refer to Access Permissions. Perform the following steps to create an alert:- On the left navigation menu in the MoEngage dashboard, click Settings > Reports and Alerts > Alert management.
- On the Alert management page, click + Create alert.
- On the Create alert page, enter the following details:
General details
Alert Condition
The Alert Condition section allows you to define the dynamics of the alert, including the alert type, metrics, supported operators, and evaluation frequency. This section specifies when the alert should be triggered based on the specified conditions.Supported Operators
Supported Frequency
| Frequency | Description |
|---|---|
| Hour | You can check if the chosen metric is less than, greater than, increased by, or decreased by a specified number of hours. |
| Day | You can check if the chosen metric is less than, greater than, increased by, or decreased by a specified number of days. When you select this option, a message is displayed indicating when the alert will be evaluated. Note:
|
| in a calendar month | You can check if the chosen metric is less than, greater than, increased by, or decreased by a timeframe specified within a calendar month. For example, if you create an alert on December 9 with a greater than condition, the system checks from December 1 to December 9 to see if the chosen metric is greater than the specified value. Starting the next day (Dec 10), the system checks again from December 1 to December 10 to see if the chosen metric is greater than the specified value. This continues till December 31, and an alert is sent whenever the chosen metric is greater than the specified value. If the condition is met before the end of the calendar month, alerts will be sent daily for the remaining days of the month. Note that the alert condition evaluation is reset at the start of the month. |
| in a calendar week (Sun-Sat) | You can check if the chosen metric is less than, greater than, increased by, or decreased by a timeframe specified within a calendar week. For example, if you create an alert on Monday with greater than condition, the system checks from Sunday to Monday to see if the chosen metric is greater than the specified value. Starting the next day (Tuesday), the system again checks from Sunday to Tuesday to see if the chosen metric is greater than the specified value. This continues till Saturday, and an alert is sent whenever the chosen metric is greater than the specified value. If the condition is met before the end of the calendar week, alerts will be sent daily for the remaining days of the week. Note that the alert condition evaluation is reset at the start of the week (Sunday). |
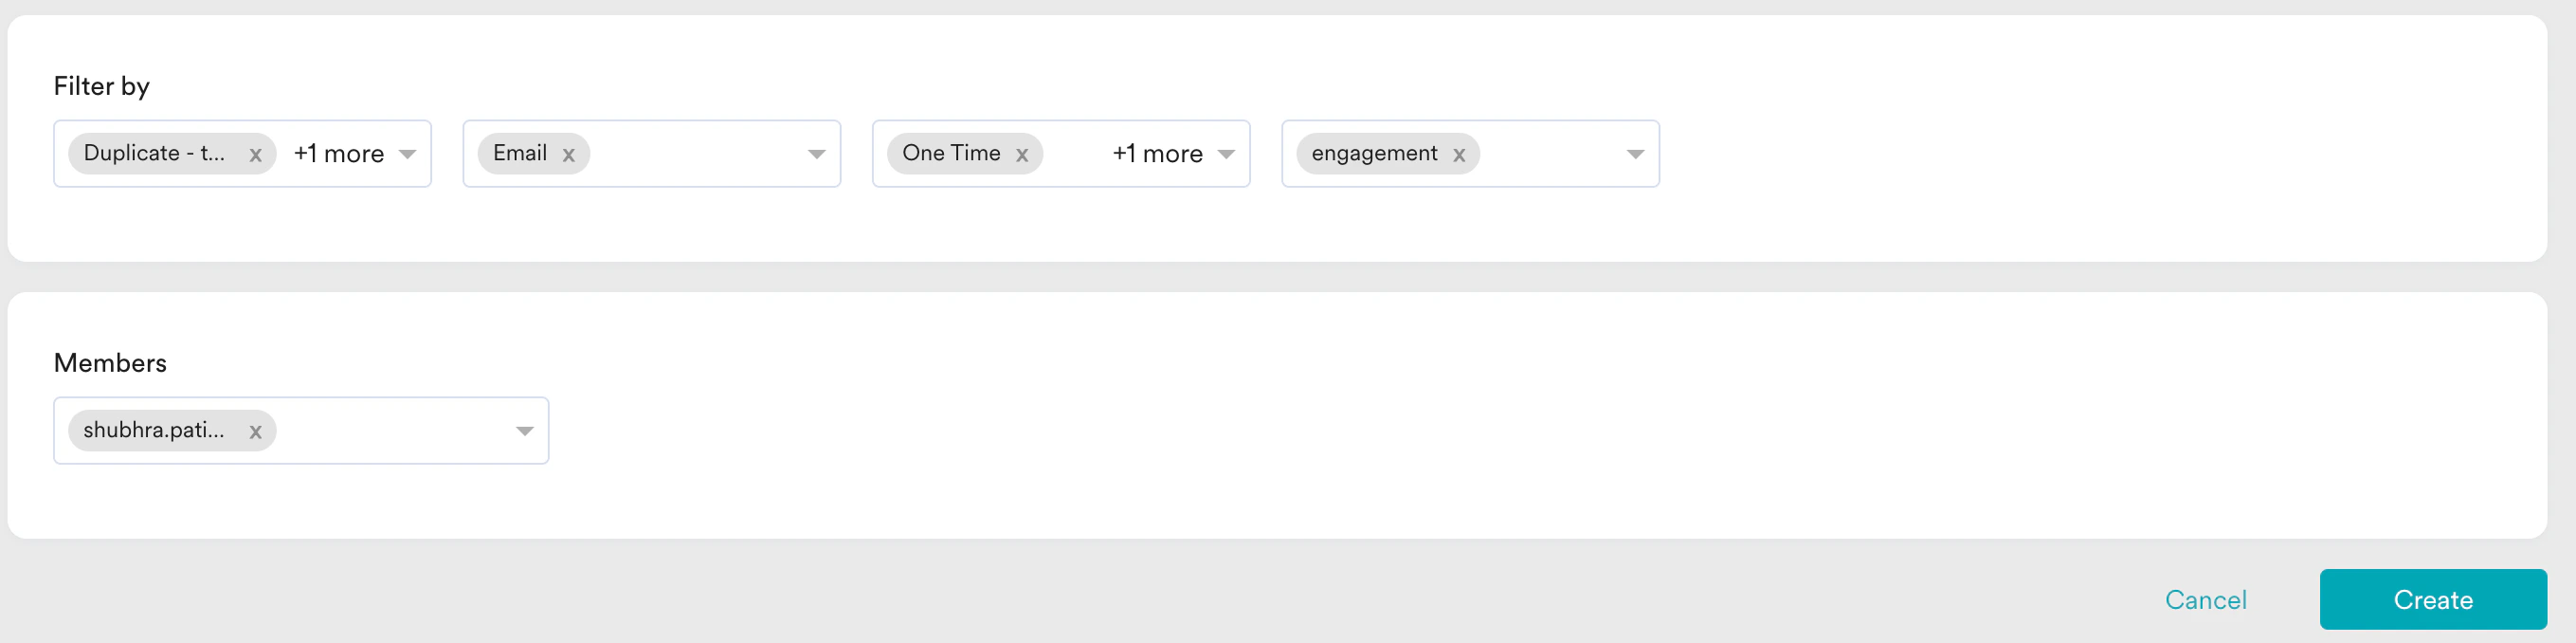
Filter By
This section is displayed when the Create Alerts On field is set to one of the following values:- Campaign expiry
- Campaign stats
- Flow stats
- Campaigns: You can select all the campaigns or specify individual campaigns for which the alert needs to be set up. This field is available only for the Campaign Expiry and Campaign Stats alerts.
- Flows: You can select all the flows or specify individual flows for which the alert needs to be set up. This field is available only for the Flow Stats alert.
- Channels: You can select All Channels or specify individual channels for which the expiry alert needs to be set up. This field is available only for the Campaign Expiry and Campaign Stats alerts.
- Delivery Types: You can select All Delivery Types or specify them individually.
- Tags: You can select All Tags (Campaign/Flow tags) or specify them individually.
Members
This field lists the email IDs of the members who will be alerted. When left unspecified, all the members will be alerted via email.- Click Create. After the alert is created, you will see a success message (as shown below) and be redirected to the Alert Management dashboard, where the newly created alert is available.
Alert Destinations
The Alert Destinations helps you reach your users where they’re most active, enabling real-time alerts without requiring users to switch between apps. You can now deliver real-time alerts directly to your preferred destinations in addition to Email, for detailed instructions, please refer to the following articles: This helps you notify users without having to switch between tools. You can select your preferred alert destination from the Send Alerts on dropdown.How Alerts Work
MoEngage monitors campaign performance and triggers alerts when specified thresholds are met. The evaluation frequency and alert behavior depend on the campaign type and defined alert conditions. Below are examples of how alerts work for different delivery types:This section specifically applies to alerts in Campaigns and Flows.
One Time Campaigns
A one-time campaign is a single-instance communication, such as a promotional email for a flash sale. After sending the campaign, the system evaluates the specified performance thresholds within the defined time frame. If the set threshold is breached, an alert is triggered.Scenario
- Configured Alert: Open rate < 10% to be evaluated one hour after the campaign is sent.
- Evaluation: The system checks the open rate after one hour and sends an alert if the rate is below 10%. No further alerts are generated for this campaign.
Periodic Campaigns
A periodic campaign, such as a weekly newsletter, is sent on a scheduled basis. The system evaluates alerts at regular intervals (for example, every day or week) to track trends over time. If a performance threshold is breached during an evaluation, an alert is triggered.Scenario
- Configured Alert: Click-through rate (CTR) < 5% to be evaluated every 7 days.
- Evaluation: The system checks the CTR every seven days. If the CTR drops below 5%, an alert is sent.
For Periodic alerts, data considered is from Feb 1 to Feb 8 for the first alert and then from Feb 8 to Feb 15 for the second alert.
Event-Triggered Campaigns
User actions, such as a transaction confirmation email, activate an event-triggered campaign. The system continuously monitors performance within a set evaluation period (for example, every 12 or 24 hours). If the threshold is breached during any evaluation window, an alert is triggered.Scenario
- Configured Alert: Email delivery rate < 90% to be evaluated within a 24-hour window.
- Evaluation: The system checks the delivery rate every 24 hours. If it drops below 90% during any evaluation, an alert is sent.
For Event-triggered alerts, data considered is from Feb 25, 9:00 AM to Feb 26, 9:00 AM for the first alert, and then Feb 26, 9:00 AM to Feb 27, 9:00 AM for the second alert, and so on.
Example
The following example illustrates how to set up an alert when your campaign’s failure rate decreases by more than 10% from its start time.- On the Create Alert page, in the General details section, type the Alert Name as Test_Alert_Stats.

- In the Create Alerts On list, click Campaign Stats.
- In the Alert Condition section, enter the details as mentioned below:
- In the Evaluate Condition on list, click Campaign Start time.
- Choose the metric for which you want to set up the alert in the Send alert when list and select the operator as Decreases by more than.
- Select the percentage in the textbox and choose Hour in the Hour/Day list.
- You can compare this rate with respect to the moving average of the last ‘x’ hours or days.

- Configure the Filter by conditions and add relevant members to the respective section.
- Click Create.